 |
| Yeast from 1996 |
The other day while cleaning out a spice cupboard I discovered two strips of yeast packets that had been long forgotten behind seldom-used items like a seed sprouter and a broken garlic press that I previously couldn't bring myself to throw out (it's now gone). While finding yeast packets might seem rather unremarkable, these packets were "special" in that they had best-by dates from 1996--which means the packets were at least 16 years old, and probably closer to 17 years.
While the practical side of me wanted to throw them out, the "mad scientist" side was morbidly curious and wanted to find out if this relatively ancient yeast might still be alive and usable. Reluctant to waste a batch of flour, milk and other bread ingredients on what was likely to be a lost cause, I turned to my friend Chef Jenni of Pastry Chef Online to ask what she would do if she were in my shoes. Sharing my morbid curiosity, she promptly suggested a third option I hadn't considered: Proofing 1 packet of the old yeast.
 At this point I must confess that I rarely proof my yeast before baking. Well, ok... I NEVER proof my yeast. And in all the years I've been baking, I've never had bread fail due to "dead" yeast. But I was familiar with the concept of proofing and this was precisely the sort of situation in which one would want to proof yeast before using. I assembled my materials for the Great Yeast Revival Experiment: 1 packet of vintage January 1996 Fleischmann's Rapid Rise Yeast, 1/2 cup water, 1 tablespoon sugar, a Pyrex measuring cup, whisk, kitchen thermometer and a timer. And a notepad, pencil and camera to document the event.
I heated the water to 120°F (below the suggested temperature range of 125-130°F on the packet), dissolved the sugar in the warm water, whisked in the yeast, and set the timer to go off in 10 minutes after which I would pronounce the yeast dead or alive, based on whether it had bubbled up a frothy foam and released that unmistakeable yeast aroma that I enjoy.
Upon hearing the timer, I returned to the kitchen to discover that the yeast was, in fact, alive and bubbling, albeit somewhat less enthusiastically than fresh, young yeast still in its prime.
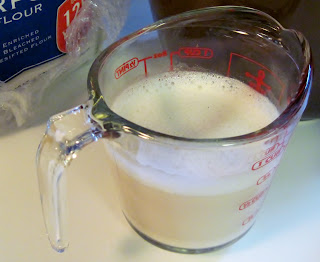
Thinking that this elderly yeast would benefit from a little more time to feast on the sugar water, I reset the time for another 5 minutes. After a total proofing time of 15 minutes, I was delighted to discover that the yeast had produced a very respectable head of foam:
Unfortunately, I did not have enough time to use the proofed yeast in a bread recipe prior to heading out for an evening commitment. Not wanting to kill my newly-revived old yeast, I turned again to the ever-helpful Chef Jenni to ask for advice. On her recommendation I whisked in a little more sugar and a bit of flour to give the activated yeast something to work on overnight and then stored it in my refrigerator to use the following morning.
In the morning I removed the proofed yeast from the refrigerator and placed it on a counter to come to room temperature over the course of a couple of hours.
When I was ready to bake, I pulled out my simplest, most familiar bread recipe: Easy English Muffin Bread. Having halved it many times before when I wanted to bake only 1 loaf, I knew this would be the right recipe to see what the old yeast could do.
Because the yeast had been proofed in 1/2 cup water with over a tablespoon of sugar, I had to modify my recipe accordingly. I heated 3/4 cup milk to 120°F and then whisked in the proofed yeast liquid. I poured this into the combined dry ingredients (I added only 1 tsp sugar to the dry because the yeast had already received over 1 Tbs) and then continued with the recipe. This is what the dough looked like before I covered it with a towel and placed it in my oven with light on to rise in a warm environment:
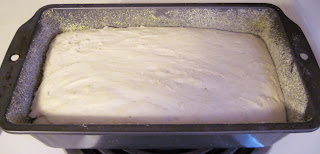
My recipe calls for 45 minutes for rising and normally the dough doubles in size in that time. But in this case it had only risen a little, which was consistent with Chef Jenni's advice that refrigerated proofed yeast, especially very OLD yeast, would take much longer to rise:
After another 45 minutes the bread still hadn't doubled, although it was continuing to make progress:
I was running out of time and patience, so this time I set the timer for only 30 additional minutes, for a total rising time of 2 hours. The dough *almost* doubled by then, but not quite:
I removed the bread from the warm oven, preheated the oven to 400°F and baked the loaf for 25 minutes as usual. When it was done, it looked quite similar to bread made with fresh yeast:
I transferred the bread to a cooling rack for a few minutes:
When I cut into the bread, I noticed that it was a little denser than usual. Had I let it keep rising longer than two hours, I suspect it would have produced a lighter crumb. Nevertheless, it was delicious.
Thus concludes Part 1 of the Great Yeast Revival Experiment, proving that "teenaged" yeast can still be used to bake bread. Because the overnight refrigeration added a second variable to this experiment, a second test is warranted and will be conducted on a day when I can bake with the proofed yeast immediately instead of refrigerating it overnight. So stay tuned for Part 2, coming soon!
Please leave a comment below to share your story of the oldest ingredient or food you've found and dared to eat.
Zestfully yours,
Gloria
Carolina Sauce Company, Inc.


No comments:
Post a Comment